Résumé automation with LaTex, Pandoc, Markdown, and CI/CD, for people who can't help themselves.
- career
- gitlab
- over-engineering
Writing a résumé can be frustrating. Especially when using MS Word, the word processor of global-dominion, to create it with. Typesetting in Word feels like taking a gamble with the ancient gods. Nudge a table column by 1 pixel too much, and boom, the layout explodes in your face.

What if I told you there was an easier other way to build a résumé?
In this article, I hope to outline a method to create a PDF résumé that can be automatically rebuilt when changes to content or formatting are made, and that will be structured in a way that is optimized for ATS scanners.
Enter Markdown
Markdown is a simple plain-text file format. The majority of this site’s content, including this page, is derived from it. Using Markdown for the content provides a foundation that helps separates data from its implementation.
# Hello

I'm Markdown. Simple text with **minimal** syntax.
FrontMatter for Structured Metadata
Markdown files can be extended with FrontMatter. FrontMatter allows you to specify a YAML header of key-value pairs in a Markdown file. Standard YAML syntax is supported, so you can specify simple key-value fields, arrays, or maps. With this you can pass structured metadata along with the body content for use during processing.
---
title: A Markdown doc with FrontMatter headers
a_list: [one, two, three]
a_map:
    key: value
    key2: value
---

# Hello

I'm Markdown. Simple text with **minimal** syntax.
Destructuring a résumé
A résumé can be broke down into several sections or content types, such as:
- Header
- Footer
- Work Experience
- Education
- Skills
There may be more sections depending on the profession or use-case.
For each section, break down the information contained within to its atomic components. Using education as an example, you’d need to represent the educational institution, the award, graduation date, etc. The header could contain the metadata about you, such as name, email, phone, etc. For each section, create a Markdown template and use FrontMatter syntax to define the metadata items. The snippet below presents the content for a mythical job entry, using FrontMatter for the structured metadata and regular Markdown for the list of duties and accomplishments.
---
employer: "Some employer"
location: "123 Fake Street, Springfield, USA"
role: "V.P. of Intangibles"
date_from: "2020"
date_to: "2022"
---

1. Some big accomplishment
2. Another big humble brag

-   Something you did
-   Another thing you did
You’d end up with several of these Markdown files, one for each job, academic qualification, etc.
Structuring with LaTeX
Markdown on its own doesn’t get us far. We need a way to structure the content into something presentable. Enter LaTeX, a typesetting system popular in academia. LaTeX allows you to write documents in a syntax that can be obtuse at times, but which provides unprecedented control. Styles and positioning can be defined with extreme precision, custom commands easily created, and a diverse ecosystem of packages can be imported to extend functionality.
% Example LaTeX document
\documentclass{article}
\begin{document}
\section{Example Title}
And some \textbf{content here}.
We can also import from other LaTeX files:
\input{path/filename}
\end{document}
You’ll need to create a main placeholder document like the example above, into which the output we generate will be imported. A PDF of the final LaTeX document can then be compiled using xelatex, a LaTeX typesetting engine that supports Unicode content.
Pandoc, the Swiss Army Knife of document conversion
So, we need to convert our content from Markdown to Latex and insert it into a LaTeX document, then compile that document to PDF. Pandoc is an ideal tool for this purpose. It can convert to-and-from a wide array of content types including Markdown and LaTeX, and can compile from LaTeX to PDF using the xelatex engine.
Pandoc is a CLI tool. Give it an input file, an output type, and an optional template file, and it will do the rest.
Creating LaTeX templates
When generating the output file, Pandoc can apply a template to the source data. For each content type, you can define a LaTeX template to map the data into the desired layout. A LaTeX template for the earlier employment example would look something like this.
% LaTeX template: templates/employment.tex
${if(employer)}
  \subsection*{$employer$ \hfill \textbf{$location$} }
${endif}

\subsubsection*{
  \textbf{$role$} \hfill \normalsize{
    \textbf{$date_from$ \textemdash{} $date_to$}
    }
}
$body$
Symbols starting with a \ such as \subsection and \subsubsection are LaTeX commands. These commands will be executed later, when the final document is compiled. Variables contained within $ symbols are how Pandoc reads the data fields we defined in the Markdown file. The special field $body reads the entire body of the Markdown file. When Pandoc is executed, it converts and populates the metadata and body content into the template fields, and saves the resulting LaTeX fragment as output.
% Markdown content rendered into LaTeX template
\subsection*{
  Some employer \hfill
  \textbf{123 Fake Street, Springfield, USA}
}
\subsubsection*{
  \textbf{V.P. of Intangibles}
  \hfill
  \normalsize{
    \textbf{2020 \textemdash 2022}
  }
}
\begin{enumerate}
\tightlist
\item Some big accomplishment
\item Another big humble brag
\end{enumerate}

\begin{itemize}
\tightlist
\item Something you did
\item Another thing you did
\end{itemize}
The Markdown lists in the body of the content file are mapped into LaTeX lists.
Processing content files in the shell
Repeat this process for all content types, and the resulting LaTeX fragments can then be assembled into the final document. Pandoc accepts multiple inputs via globbing, but this has the side effect of overwriting the FrontMatter metadata of all but the last file. As a workaround, we can use the shell to iterate over the files one by one, and call pandoc on each individual file.
SRC="content/*/[0-9][1-9]-*.md"
for src in $SRC; do \
  category="$(basename $(dirname "${src}"))";\
  tmp=${src%.*};\
  num=$(echo "${tmp##*/}" | cut -f1 -d"-");\
  filename=${category}-${num};\

  pandoc ${src} -o build/${filename}.tex --template templates/${category}.tex
done
Each content type is contained in its own subdirectory, e.g. 01-employment/03-somejob.md, 03-education/01-grad.md. Both the parent directories and the content files are prefixed with a 2-digit number to assist with ordering of sections and items during import into the final LaTeX document. The loop operates on each file path, grabbing the parent directory name and concatenating it with the file’s prefix, resulting in output filenames like 01-employment-03.tex, which are ready to be assembled into the final document.
Assembling the Final LaTeX document
The overall project structure would look something like this:
build/
content/
  01-experience/
    00-subheading.md
    01-some-job.md
    0n-other-job.md
  02-skills/
    00-subheading.md
    01-skills.md
  03-projects/
    00-subheading.tex
    01-project.tex
    0n-project.text
  header.md
  footer.md
templates/
  experience.tex
  skills.tex
  education.tex
  project.tex
resume.tex
resume.sty
resume.cls
As shown earlier, the main resume.tex document doesn’t have to be elaborate, simply a skeleton to receive the generated fragments. If you know the specific filenames that will be output from Pandoc, and don’t expect them to change often, you can just list them explicitly in the main LaTeX file, and they will be imported during PDF build.
But automation is nice, so I generated a file that dynamically lists the LaTeX build fragments that are created. The example shell script below creates a LaTeX file called list_all.tex, into which is inserted a LaTeX \input{file} command for each of the LaTeX output fragments Pandoc generates. The command tells LaTeX to inject the given file into the main document flow at that position.
find $(BUILD_DIR)/[0-9][0-9]-*.tex \
| awk '{printf "\\input{%s}\n", $1}' > $(BUILD_DIR)/list_all.tex
Reference list_all.tex in the main resume.tex document.
% resume.tex
\documentclass[10pt, letterpaper]{article}
\begin{document}
\input{build/list_all}
\end{document}
In addition to the base resume.tex file, you’d also want to specify preamble definitions to provide styling and command definitions.
Styling
This article doesn’t go into styling or formatting LaTeX documents. May that be a fun journey for you to explore on your own. 🤓 Overleaf is a great learning resource.
Compiling to PDF
The xelatex binary is included with Pandoc, so we can just call it directly on resume.tex.
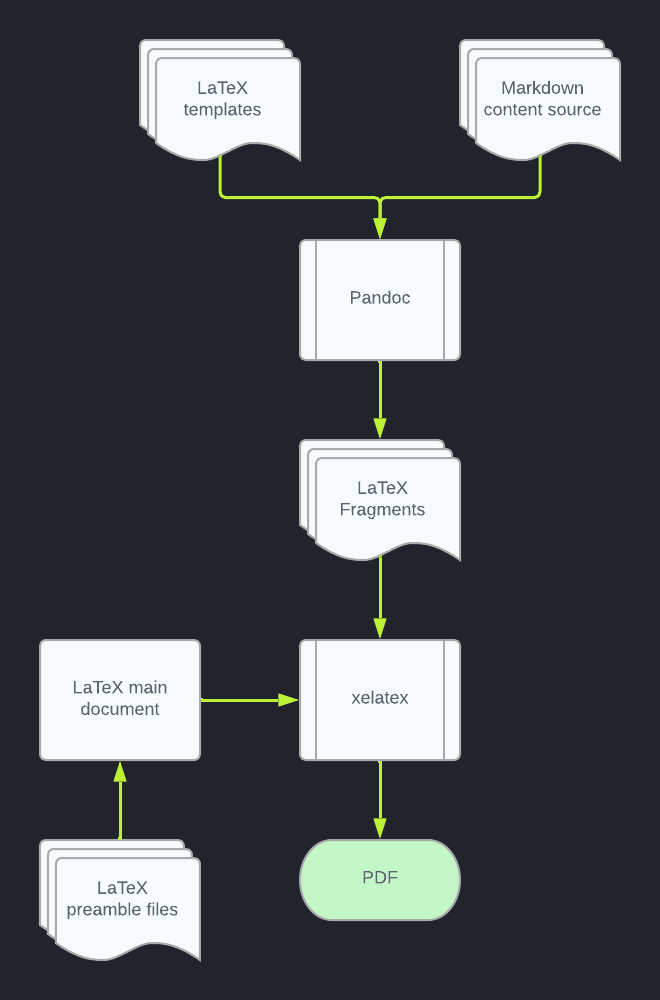
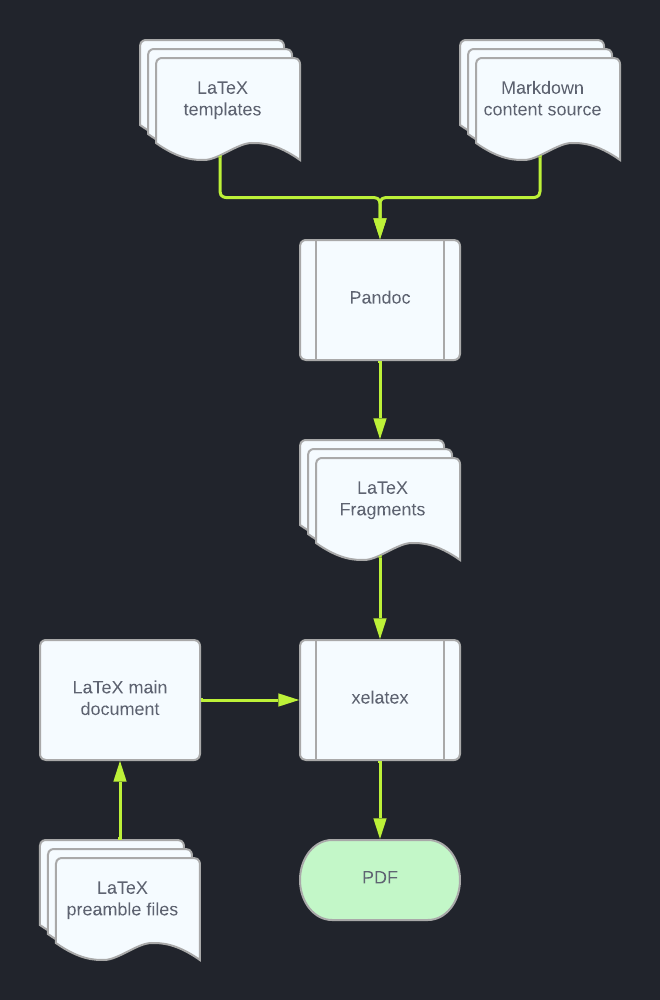
xelatex -output-directory output/ resume.texIf all goes well, a PDF file will be written to output/resume.pdf. A flow of the process is shown below.


Automating builds with pipelines
We have our Markdown content, Pandoc generating LaTeX, and xelatex outputting a PDF. Time for some CI/CD. The résumé content and templates are both stored in Git repos. My CI platform of choice is GitLab, but the steps here are translatable to any other CI system. I opted to use the texlive container image instead of pandoc’s own image, since the pipeline performs additional command line tasks.
The CI/CD build process is triggered when changes are made to the template or content repos, and performs the following tasks:
- Loads the content repo submodule
- Uses
pandocto generate the LaTeX fragments from the Markdown source. - Lints all LaTeX files using
chktex. - Builds the PDF artifact with
xelatexusing the main LaTeX document and fragments. - For
mainbranch builds:- Tags and creates a release of the PDF artifact.
- Uploads the PDF to a storage location.


Output HTML for a website
The Markdown content can also be incorporated into a website. Pandoc can convert Markdown to HTML fragments, or if your website uses a SSG like Astro or Hugo, you can feed the Markdown files directly to it.
This site is generated by Astro. During build, the résumé’s Markdown content is loaded as a Git submodule, which is then fed through .astro layout files to create the final HTML output. Any changes made to the résumé content repo will trigger an update to the version displayed on the site, and create an updated build of the output PDF. This provides a single source (the content repo) that needs to be updated when information in the résumé changes. Makes a mental note to check out LinkedIn’s API.
Wrap up
This is a lot of information to digest while remaining a high level introduction to Pandoc and LaTeX, but hopefully this gives you inspiration to explore building and automating your own résumé.
To summarize the process:
- Use Markdown for the content. Add FrontMatter headers for structured metadata.
- Use LaTeX for templating. Design LaTeX templates to structure the layout of each content type.
- Convert your Markdown to LaTeX with Pandoc. Use
pandocto convert the Markdown files into LaTeX fragments using the templates. - Combine your LaTeX output. Create a main LaTeX document file, optional class and style definitions, then reference your generated LaTeX fragments in that main document.
- Make a PDF. Compile the main document to PDF using
xelatex. - Automate the process. Use CI/CD to automate the build process, and publishing of updated versions.
The source code for my current setup, and CI pipeline is viewable at https://gitlab.com/flushablpet/resume-template. Have fun building!


